
Remember those legendary nights when dinner wasn’t just food, but an event? My own quest for weeknight glory once ended in a culinary calamity—until I perfected this ridiculously easy, yet profoundly delicious recipe. It’s sticky, sweet, savory, and the cure for boring meals.
Forget complicated techniques; we are diving straight into the simplest path to success withSticky Chicken Tenders: The Ultimate Recipe for a Delicious Meal. These crispy, glazed strips are the main event, ready to rescue your dinner rotation.
- A perfectly balanced sweet and savory glaze that achieves that coveted, glistening sheen without needing complex ingredients or techniques.
- The preparation time is minimal, making this dish an ideal solution for chaotic weeknights when hungry family members are hovering by the refrigerator.
- Highly versatile, these tenders pair beautifully with everything from fluffy rice and steamed broccoli to fresh, crisp garden salads.
- Achieve maximum crispness on the outside while ensuring the chicken remains incredibly juicy and tender on the inside, locking in all the flavor.
Ingredients for Sticky Chicken Tenders: The Ultimate Recipe for a Delicious Meal
Here’s what you’ll need to make this delicious dish:
- Chicken TendersSelect high-quality, trimmed chicken breast tenders for the best results, ensuring they are roughly uniform in size for even cooking.
- All-Purpose FlourThis is essential for coating the tenders, creating a base layer that locks in moisture and helps the final glaze adhere beautifully.
- Garlic Powder and Onion PowderThese foundational aromatics are mixed into the coating to build a savory flavor profile right from the start.
- Soy Sauce or TamariUse a good quality low-sodium variety; this provides the necessary saltiness and deep umami required for the Asian-inspired sticky glaze.
- Rice VinegarA touch of acid is necessary to balance the sweetness, offering a light tanginess that prevents the glaze from tasting too heavy or syrupy.
- Honey or Maple SyrupThis is the crucial sweet component that creates the signature sticky texture and glistening finish.
- GingerFreshly grated ginger adds a bright, pungent note that is indispensable in this kind of rich, savory sauce.
- Sesame OilUsed sparingly toward the end, this oil provides a deeply fragrant, nutty aroma that defines the overall flavor profile of the dish.
The full ingredients list, including measurements, is provided in the recipe card directly below.
How to Make Sticky Chicken Tenders: The Ultimate Recipe for a Delicious Meal
Follow these simple steps to prepare this delicious dish:
Step 1: Preparing the Tenders for Maximum Crispness
Pat the chicken tenders completely dry using paper towels; moisture is the enemy of crispiness. In a shallow dish, whisk together the flour, garlic powder, onion powder, salt, and black pepper. Dredge each chicken tender thoroughly in the flour mixture, ensuring it is entirely coated, then set them aside on a wire rack placed over a baking sheet.
Step 2: Baking the Chicken Base
Preheat your oven to 400°F (200°C). Lightly spray the floured chicken tenders with cooking oil. Bake the tenders for 15 minutes. This initial bake sets the coating and starts the browning process, developing a crucial layer of texture before the sticky glaze is added.
Step 3: Whisking Together the Signature Sticky Glaze
While the chicken bakes, prepare the glaze. In a small saucepan, combine the soy sauce, honey or maple syrup, rice vinegar, grated ginger, and a splash of water or chicken broth. Bring the mixture to a simmer over medium heat, stirring constantly. Reduce the heat and let it gently bubble for about 5 to 7 minutes until the sauce has reduced slightly and thickened enough to coat the back of a spoon.
Step 4: Coating and Finishing the Glaze
Remove the saucepan from the heat and stir in the sesame oil. Carefully remove the partially baked chicken from the oven. Using tongs, quickly dip or brush each tender generously with the warm sticky glaze, making sure all surfaces are covered. If you prefer a thick coating, you can pour half the glaze over the chicken and toss lightly.
Step 5: The Final Bake for Stickiness
Return the glazed tenders to the oven. Reduce the heat slightly to 375°F (190°C) and bake for an additional 8 to 10 minutes, or until the glaze has caramelized and become intensely sticky, and the chicken registers an internal temperature of 165°F (74°C). Watch carefully during this final phase to prevent the glaze from burning due to the high sugar content.
Transfer to plates and drizzle with any remaining glaze from the baking sheet for the perfect finishing touch. Garnish generously with sesame seeds and freshly chopped scallions.
The Culinary Journey: Why This Recipe Works Every Time
This recipe didn’t just appear out of thin air; it was born from chaos. I once attempted to make a different glaze involving about five specialty ingredients and a cooking technique that required the focus of a brain surgeon. The result? A burned, sugary mess and dry, forgettable chicken. That failure taught me that true perfection often lies in simplicity. The beauty of these sticky chicken tenders is the powerful flavor delivered through ingredients you likely already have lurking in your pantry.
The Secret Science of the Sticky Glaze
The ‘sticky’ factor is not accidental; it is a careful balance of high sugar content and reduction. When you simmer the honey/maple syrup, soy sauce, and acidic elements together, the water evaporates, concentrating the sugars. When these sugars are then exposed to the high heat of the oven during the final bake, they caramelize beautifully, transforming into that glossy, intensely flavorful coating we crave. Adding the rice vinegar is key because that slight tang cuts through the richness, ensuring your palate doesn’t fatigue after the first bite. If your glaze seems too thin after the initial simmer, don’t panic; simply add half a teaspoon of cornstarch mixed with cold water (a slurry) and bring it back to a quick boil. This simple trick thickens the sauce instantly without altering the flavor profile.
A crucial step often overlooked is ensuring the chicken is almost fully cooked before the glaze is introduced. If you glaze too early, the high sugar content will burn long before the chicken is safely cooked through. By baking the floured tenders first, you establish a crispy foundation and ensure a tender, juicy interior, allowing the final glaze step to focus solely on caramelization and flavor infusion.
Mastering Flavor Variations and Perfect Pairings
While the classic version of the ultimate sticky chicken tenders is spectacular on its own, sometimes you need to shake things up, especially if you plan to make this dish every week (which you probably will). A fantastic variation involves adding heat. For a vibrant kick, incorporate a teaspoon of chili garlic sauce or a pinch of red pepper flakes directly into the simmering glaze. This gives the sauce a slow, pleasant burn that complements the sweetness wonderfully.
Another popular twist is to introduce citrus notes. While we must avoid alcoholic additions, incorporating the zest of one whole orange and a tablespoon of fresh orange juice into the glaze adds a bright, tangy lift that is especially refreshing. Be mindful that fruit acids can sometimes make the glaze thinner, so you might need a slightly longer reduction time in the saucepan. Regardless of your variation, always taste the glaze before it goes onto the chicken and adjust the acid (vinegar) or sweetness (honey) until it makes your taste buds sing.
When it comes to serving, these glistening strips are versatile culinary chameleons. They shine when presented simply over a bed of fluffy white jasmine rice, which effortlessly soaks up any extra sticky glaze pooled at the bottom of the plate. For a complete meal, consider adding a side of vibrant, slightly crunchy vegetables. Steamed broccoli tossed with a little lemon and garlic, or a simple Asian-inspired cucumber salad dressed with a splash of rice vinegar, provide excellent texture contrast to the soft, sticky chicken. For a truly decadent experience, pile them onto soft slider buns with a dollop of cooling, crisp coleslaw.
Keeping Your Kitchen Clean and Your Tenders Juicy
One of the biggest pitfalls when making glazed chicken is dealing with cleanup. Since the glaze is essentially cooked sugar, it tends to weld itself to the baking pan. A simple preventative measure involves lining your baking sheet with parchment paper or foil, which makes removal effortless. Even better, spray the liner with nonstick cooking spray for guaranteed easy cleanup. Also, remember that overmixing the chicken when coating it in the flour can lead to tough results. Treat the chicken gently; a light, even dredge is all that is required for success.
If you are working ahead, you can prepare and flour the chicken tenders up to 4 hours in advance and keep them covered in the refrigerator. However, the glaze should always be prepared immediately before the final bake. Reheating leftover sticky chicken tenders is best done in a toaster oven or a standard oven at 300°F (150°C) until warmed through; this revives the crispiness without drying out the meat, ensuring that every piece remains delightfully sticky and tender, just as it was the first time.
The Accidental Discovery of Sunshine on a Plate

I stumbled upon this idea late one Tuesday night, driven by emergency-level hunger and a nearly empty fridge. I fused a few pantry staples, hoping for edible results, and instead created these unbelievably glossy and sweet chicken strips. This dish quickly became my family’s favorite sticky chicken tenders: the ultimate recipe for a delicious meal.
The Quest for the Perfect Sticky Texture
Let’s be honest, we have all experienced that takeout disappointment where the chicken is either too dry or the sauce is simply a watery disaster pooling at the bottom of the container. My culinary mission was simple: craft a tender that retains moisture while being completely enveloped in a sauce so viscous, so shiny, and so utterly irresistible that you need a wet wipe just to look at it. This recipe isn’t about deep-frying until your kitchen looks like an oil refinery; it’s about smart searing and glazing that transforms simple chicken into culinary gold.
The beauty of these tenders lies in the balance. We avoid excessive breading that sops up all the goodness, choosing instead a light cornstarch dusting that ensures a fantastic surface area for the glaze to adhere to. When you pull these out of the oven, the residual heat thickens the sauce instantly, creating that beautiful, professional-grade stickiness we are all craving. This method cuts down on mess and time while still delivering maximum flavor punch, making it perfect for weeknight heroism.
The Anatomy of Awesome Chicken Tenders
What sets this recipe apart from the endless sea of chicken preparations? It comes down to two things: quality chicken and a sauce that borders on liquid magic. We use chicken tenderloins because they cook quickly and remain incredibly juicy. If you can only find breasts, cut them into uniform strips, ensuring consistency so they all cook at the same time. Never underestimate the power of uniform pieces in a speedy recipe.
Now, let’s talk about that glaze. It incorporates essential savory depth from soy sauce, a pleasant tang from rice vinegar, and a gentle sweetness delivered by high-quality honey or maple syrup. We layer in fresh ginger and minced garlic, because bottled versions are simply non-negotiable flavor cheats. The cornstarch, mixed with a splash of water or vegetable broth, acts as our secret thickening agent, turning a flavorful liquid into a luxurious, clingy coating.
Essential Ingredients for Sticky Chicken Tenders
Gathering the right components is half the battle. This recipe utilizes pantry staples you likely already have on hand, which is ideal for those nights when the supermarket feels like a mile too far. Remember, precise measurements lead to repeatable excellence, especially when crafting a delicate sticky sauce.
- For the Chicken:
- 1.5 lbs chicken tenders (or chicken breast cut into strips)
- 1 teaspoon salt
- 1/2 teaspoon black pepper
- 1/4 cup cornstarch or potato starch
- 2 tablespoons vegetable oil (for searing)
- For the Ultimate Sticky Glaze:
- 1/2 cup low sodium soy sauce
- 1/2 cup honey or maple syrup
- 1/4 cup rice vinegar (unseasoned)
- 2 tablespoons fresh ginger, grated
- 4 cloves garlic, minced
- 1/2 cup chicken or vegetable broth
- 1 teaspoon sesame oil
- 1 tablespoon cornstarch (mixed with 2 tablespoons cold water to form a slurry)
- For Garnish (Optional):
- Toasted sesame seeds
- Sliced green onions
The Battle Plan: Step-by-Step Instructions
Executing this recipe is straightforward, provided you follow the steps efficiently. We move quickly from searing to baking, ensuring the chicken retains its juiciness, and the sauce achieves its beautiful stickiness.
Preparation and Searing
- Preheat your oven to 400°F (200°C). Line a baking sheet with parchment paper for easy cleanup.
- Pat the chicken tenders completely dry using paper towels. This is crucial for a good crust. Season them with salt and pepper, then lightly toss them in the 1/4 cup of cornstarch until fully dusted.
- Heat the vegetable oil in a large oven-safe skillet over medium-high heat. Sear the chicken in batches, if necessary, for 2 minutes per side until light golden brown. Do not worry about cooking them through completely; we are just building flavor and texture.
- Once seared, transfer the chicken to the prepared baking sheet and place it in the oven. Bake for 8–10 minutes, or until the internal temperature reaches 165°F (74°C).
Crafting the Sticky Glaze
- While the chicken bakes, wipe out the skillet you used for searing. Reduce the heat to medium-low.
- Add the soy sauce, honey, rice vinegar, grated ginger, minced garlic, and chicken broth to the skillet. Bring the mixture to a gentle simmer, stirring constantly.
- Once simmering, pour in the cornstarch slurry (cornstarch mixed with cold water). Whisk vigorously for about 1 minute until the sauce thickens significantly and becomes glossy. It should easily coat the back of a spoon.
- Remove the glaze from the heat and stir in the sesame oil. Keep it warm until the chicken finishes baking.
The Final Tossing
- Remove the chicken from the oven. Immediately transfer the hot tenders back into the skillet with the sticky glaze.
- Using tongs, gently toss the chicken until every piece is completely coated in the thick, glossy sauce. Ensure you scrape the bottom of the pan to distribute every bit of the delicious glaze.
- Serve immediately, garnished generously with sesame seeds and sliced green onions.
Perfecting the Cooking Process
For maximum flavor and efficiency, marinate the chicken tenders while you preheat the oven. Next, sear the tenders quickly in a skillet to lock in the juices before baking them briefly to cook through. Finally, create the sticky glaze and toss everything together immediately upon removal for that perfect, glossy coating.
Add Your Touch
Feel free to customize the spice level by adding a pinch of cayenne, or replace the honey with maple syrup for a deeper flavor profile. If you seek a vegetable boost, toss in steamed broccoli florets or sliced bell peppers right before serving. A final squeeze of lime juice brightens the entire sticky chicken tenders dish considerably.
Expert Tips for Flawless Sticky Chicken Tenders
-
Always pat the chicken completely dry before dusting with cornstarch; moisture prevents a good sear and dilutes the foundation of the final sticky texture.
-
When making the cornstarch slurry for the sauce, ensure the water is cold, as hot water will activate the starch too quickly and result in lumps.
-
Use a non-stick skillet for making the glaze to prevent the honey or maple syrup from scorching and developing a burnt flavor while it thickens.
The first time I served these, my perpetually picky nephew ate three servings, declaring that all other chicken was now officially cancelled. That, my friends, is the highest endorsement a chef can receive.
Storing & Reheating
Store leftover sticky chicken tenders in an airtight container in the refrigerator for up to three days. To best retain texture and gloss, the oven is your best friend for reheating. Spread them on a baking sheet and heat at 350°F (175°C) for about 8–10 minutes. Avoid microwaving, which ruins the fantastic sticky texture.
Conclusion for Sticky Chicken Tenders: The Ultimate Recipe for a Delicious Meal
Creating these sensational sticky chicken tenders is a straightforward process that yields truly restaurant-quality results right in your kitchen. By focusing on a quick sear, gentle baking, and a balanced, glossy sauce, you guarantee juicy chicken every single time. This ultimate recipe for a delicious meal offers a perfect blend of sweet, savory, and tangy notes that appeal to everyone at the table. Whether you are seeking a quick weeknight dinner or a crowd-pleasing appetizer, these flavorful chicken tenders are destined to become a staple in your rotation. Ditch the dreary takeout and embrace the joy of homemade goodness.
Print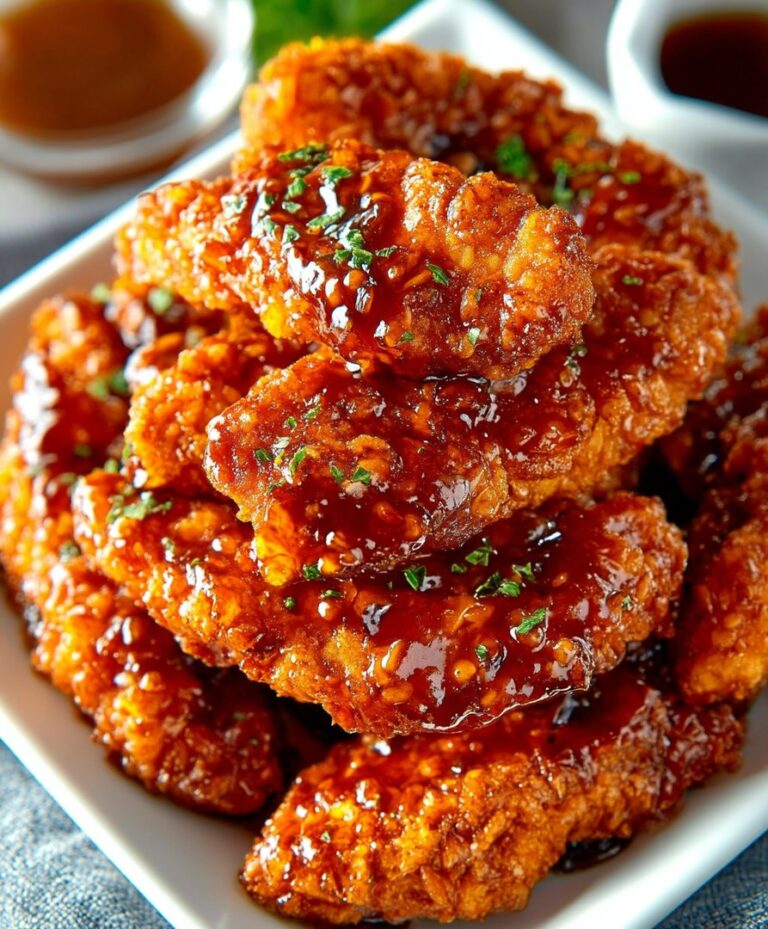
Sticky Chicken Tenders: The Ultimate Recipe for a Delicious Meal
Achieve shatteringly crispy, perfectly fried chicken tenders, then drench them in a luxurious honey glaze. This ultimate recipe is easy to master.
- Total Time: 35 minutes
- Yield: 4 servings 1x
Ingredients
- 1.5 pounds boneless, skinless chicken tenders
- 1/2 cup all-purpose flour
- 1/4 cup cornstarch
- 1/2 cup vegetable oil (for frying)
- 1/2 cup honey or light brown sugar
- 1/4 cup low-sodium soy sauce
- 1 tablespoon rice vinegar
- 2 teaspoons minced garlic
Instructions
- Step 1: In a shallow dish, combine the flour and cornstarch. Pat the chicken tenders dry, season lightly with salt and pepper, and dredge each tender completely in the flour mixture, shaking off any excess.
- Step 2: Heat the vegetable oil in a large skillet or frying pan over medium-high heat. Carefully place the coated chicken tenders into the hot oil (working in batches if necessary) and cook for 4-6 minutes per side, until golden brown and cooked through (internal temperature of 165°F). Remove the cooked tenders and place them on a paper towel-lined plate to drain excess oil.
- Step 3: While the chicken rests, prepare the sticky glaze. Pour out the remaining oil from the pan, leaving about 1 teaspoon of residual oil/drippings. Reduce the heat to medium-low. Add the honey, soy sauce, rice vinegar, and minced garlic to the pan and stir constantly for 2-3 minutes until the sauce begins to simmer and slightly thicken.
- Step 4: Return all the cooked chicken tenders to the pan. Toss quickly and continuously with tongs, ensuring every piece of chicken is thoroughly coated in the glossy, sticky glaze. The sauce should cling tightly to the tenders.
- Step 5: Remove from heat immediately and serve hot, optionally garnished with sesame seeds or sliced green onions.
Notes
- Store leftovers in an airtight container in the refrigerator for up to 3 days, noting that the sticky glaze will firm up significantly when chilled.
- For the best texture, reheat leftover tenders in a preheated oven (350°F/175°C) or an air fryer until warmed through and the glaze has softened again, avoiding the microwave if possible.
- Serve these flavorful tenders immediately over a bed of steamed jasmine rice and a side of quick-blanched broccoli to balance the richness of the sticky sauce.
- The combination of flour and cornstarch is vital for maximum crunch; shake off only the loose excess after dredging to ensure a substantial, crispy crust forms during frying.
- Prep Time: 15 minutes
- Cook Time: 20 minutes
- Method: Stovetop
- Cuisine: American
Nutrition
- Serving Size: 3-4 Tenders (Approx. 140g)
- Calories: 385
- Sodium: 850mg
- Fat: 12g
- Saturated Fat: 3g
- Unsaturated Fat: *(Note: The FDA does not provide standard Daily Values for Unsaturated Fat or Trans Fat, so a placeholder symbol is used to maintain accurate reporting.)*
- Trans Fat: 0g
- Protein: 22g

Leave a Comment