
We’ve all been there: standing over the stove, spatula in hand, trying to flip a fussy pancake while simultaneously attempting to locate a matching sock. The chaotic dance of weekday breakfast prep is often exhausting, demanding time we simply don’t have before the day truly begins. But imagine a world where breakfast prep is effortless, highly nutritious, and baked right into a perfect single serving. Say hello to the glorious, time-saving magic ofBaked Protein Pancake Bowls, delivering maximum flavor with minimum effort.
These fantastic bowls require minimal active cooking time, letting the oven do all the heavy lifting while you enjoy your morning coffee blissfully.
Customize the sweet vanilla base with endless combinations of fruit, chocolate chips, nuts, or a hearty swirl of cinnamon sugar for daily variety.
The individual presentation in small ramekins makes serving sophisticated and fun, guaranteeing a picturesque and satisfying breakfast display.
Ideal for meal prepping, these bowls reheat beautifully, ensuring you have a wholesome, power-packed breakfast ready for busy weekdays.
Ingredients for Baked Protein Pancake Bowls
Here’s what you’ll need to make this delicious dish:
- Protein Powder (Vanilla or Unflavored)This is the muscle behind the bowl; choose a high-quality plant-based protein powder or plant-based powder for the best texture and nutritional balance.
- Rolled Oats (Old-Fashioned)Oats provide necessary structure and chewiness, ensuring the bowl is hearty and keeps you feeling full until lunchtime.
- Milk (Dairy or Non-Dairy)Use any milk you prefer to achieve the desired batter consistency; almond or oat milk works especially well for a tender crumb.
- Eggs (Large)Eggs act as the primary binder, locking the ingredients together so the pancake holds its shape beautifully while baking.
- Baking PowderEssential for lift, this ensures the bowls rise and become light and fluffy rather than dense, overly compacted discs.
- Maple Syrup or HoneyA natural sweetener that adds depth of flavor and helps caramelize the edges during the crucial baking process.
- Vanilla Bean PasteJust a splash brightens the entire flavor profile, making the final dish taste delightfully like a true, comforting homemade pancake.
- Cinnamon and SaltCinnamon adds warmth and complexity, while a pinch of salt balances the sweetness, enhancing all the other ingredients.
The full ingredients list, including measurements, is provided in the recipe card directly below.
How to Make Baked Protein Pancake Bowls
Follow these simple steps to prepare this delicious dish:
Step 1: Preheat and Prepare the Vessels
Preheat your oven to a reliable 375°F (190°C). This recipe works best in sturdy, oven-safe ramekins or small ceramic bowls that hold about 8 to 10 ounces of volume. Generously spray the inside of each bowl with non-stick cooking spray; this step is absolutely crucial unless you want a permanent bond between your breakfast and your dishware after baking.
Step 2: Combine the Dry Powerhouses
In a large mixing bowl, whisk together the protein powder, rolled oats, baking powder, cinnamon, and a pinch of salt until they are completely uniform. Ensuring these dry ingredients are thoroughly integrated prevents pockets of unmixed powder, which can lead to a gritty texture in the final bite. Set this robust mixture aside briefly while you prepare the liquid components.
Step 3: Mix the Liquid Foundation
In a separate medium bowl, lightly whisk the eggs until they are slightly frothy and pale yellow. Incorporate the milk, maple syrup or honey, and vanilla bean paste until they are fully emulsified. Whisking these wet ingredients thoroughly ensures even distribution of sweetness and moisture throughout the batter, guaranteeing tender results.
Step 4: The Great Batter Merger
Pour the wet ingredients slowly into the dry mixture. Stir the mixture until it is just combined; remember, the cardinal rule of pancake making is never to overmix! A few small lumps are perfectly acceptable and actually desirable, as overmixing activates the gluten, resulting in a tough, less tender bowl. Let the batter rest for five minutes while the oven finishes preheating; this rest allows the oats to start absorbing moisture.
Step 5: Fill, Top, and Bake
Divide the rested batter evenly among your prepared ramekins. Fill them about two-thirds of the way up, giving the baking powder ample room to perform its magical lift. Now is the perfect time for customization: sprinkle the tops with fresh berries, sliced bananas, or a handful of dark chocolate chips. Bake for 18 to 22 minutes, or until the tops are beautifully golden brown and a toothpick inserted into the center comes out clean and crumb-free.
Transfer carefully to cooling racks for a few minutes before enjoying them right out of the bowl. Top them with a dollop of Greek yogurt for added tang and a final, celebratory drizzle of syrup.
Why Baking Beats Frying for Ultimate Efficiency
If you’re anything like me, the phrase “cook multiple pancakes simultaneously” sounds less like breakfast planning and more like a poorly executed juggling act. The traditional stovetop pancake method demands constant attention, flipping, temperature management, and inevitably, the sacrifice of the first pancake to the culinary gods (it’s always ugly). These individual protein bowls eliminate every single one of those stressors. You simply mix, divide, shove them into the oven, and walk away. The oven acts as a consistent, reliable babysitter for your breakfast, allowing you to focus on drinking coffee, gathering your thoughts, or finally packing your lunch.
The Power of Portion Control
One of the quiet superpowers of theseBaked Protein Pancake Bowlsis inherent portion control. When you pour batter into a skillet, it’s easy to create stacks that would challenge the appetite of a lumberjack. By using individual ramekins, you create perfectly sized, satisfying portions without needing a scale or measuring cups to police your breakfast consumption. This format makes calculating your macronutrients far easier, perfect for anyone focusing on fitness or mindful eating, ensuring a substantial protein hit without an overwhelming sugar crash halfway through the morning.
Effortless Meal Prep Strategy
These baked breakfast treats are the gold standard for meal prepping. You can mix the batter on a Sunday evening and bake six bowls simultaneously. Once cooled, they store beautifully in the refrigerator for up to four days. Reheating takes less than a minute in the microwave, delivering a warm, tender, high-protein breakfast that tastes just as fresh as the day it was baked. This simple strategy guarantees that even on your most frantic Tuesday morning, you can grab a substantial, nutritious breakfast without resorting to highly processed convenience foods.
Customizing Your Protein Pancake Masterpiece
While the basic vanilla and oat recipe is wonderfully comforting, the bowl format serves as an excellent blank canvas for endless flavor creativity. Think of your mixing bowl as a personalized flavor laboratory where you are the mad genius. The beauty of baking individual portions is that you can easily cater to different tastes in the household—one bowl can be purely chocolate chip while the one next to it is loaded with raspberries and lemon zest. Don’t be afraid to experiment with extracts and spices beyond basic vanilla; almond paste adds a marzipan-like sophistication, while nutmeg and cardamom provide a cozy, bakery-style warmth.
Sweet Topping Strategies
When decorating your baked breakfast, remember that some toppings should go into the batter before baking, and others are best added fresh post-baking. Items that require cooking, such as diced apples, sturdy berries (like blueberries), or chocolate chips, should be mixed into the batter or sprinkled generously on top before the ramekins hit the oven. Post-bake additions—the glamorous finishing touches—include soft toppings like sliced strawberries, a swirl of peanut butter, crushed nuts, or a dollop of high-protein Greek yogurt. For extra crunch, toast some shredded coconut before sprinkling it on top.
Flavor Boosters and Protein Swaps
If you want to move beyond the traditional pancake profile, consider infusing your batter with powerful flavor boosters. Stir in a teaspoon of cocoa powder for a rich, deep chocolate bowl, or add instant coffee granules to the batter for a mocha-flavored morning kick. For those looking to increase the nutritional density without adding sugar, incorporate two tablespoons of ground flaxseed or chia seeds into the dry mix; they will absorb moisture during the resting period and add fiber and healthy fats without altering the flavor profile significantly.
Storage, Reheating, and Keeping Your Bowls Fresh
The entire point of investing time in making these perfect protein bowls is the promise of quick, effortless breakfasts later in the week. Proper storage is key to ensuring they maintain their delightful texture. After the bowls are completely cooled (this is critical—heat creates condensation which leads to sogginess), cover each ramekin tightly with plastic wrap or transfer the individual bowls to an airtight container. They keep beautifully in the refrigerator for three to four days. If you plan to freeze them, line a freezer-safe container with parchment paper and place the cooled bowls inside, separated if possible, where they will remain fresh for up to two months.
The Best Way to Reheat Your Baked Breakfast
Reheating is fast and straightforward. If frozen, allow the bowl to thaw in the refrigerator overnight. From the fridge, you have two excellent options. For speed, microwave the bowl on high for 30 to 45 seconds until it is warmed through and steaming lightly. If you prefer a crispier exterior reminiscent of fresh baking, place the bowl back into a 300°F (150°C) oven or toaster oven for five to eight minutes. This gently warms the center while reactivating the slight crispness on the top crust. Add fresh toppings immediately before serving to complete the experience.
The Accidental Discovery of Sunshine on a Plate

I stumbled upon the idea for Baked Protein Pancake Bowls during a truly chaotic Monday morning. I’d spilled batter everywhere and, in a fit of efficiency (read: panic), I just dumped the rest into muffin tins, hoping for the best. The result? Pure, fluffy, protein-packed sunshine without the messy stovetop flip. It was revolutionary.
Perfecting the Cooking Process
Achieve perfection by prepping all your dry ingredients first, then whisking in the wet components gently but thoroughly. Fill the bowl molds immediately after mixing to prevent the leavening agents from losing their potency. Baking these bowls ensures even cooking and structural integrity, so resist the urge to peek before the 15-minute mark.
Add Your Touch
Swap vanilla protein for chocolate or even a hint of pistachio for a gourmet twist; the possibilities are endless. If you need extra sweetness, use pure maple syrup instead of refined sugar. For amazing texture, sprinkle chopped walnuts or slivered almonds on top before baking for a delightful and necessary crunch.
Storing & Reheating
Store cooled Baked Protein Pancake Bowls in an airtight container for up to four days in the refrigerator, making them perfect for meal prep. To reheat, microwave them briefly (30 seconds is usually enough) or pop them back in a 300°F oven for five minutes until they regain their delightful warmth and soft texture.
If you are anything like me, your relationship with the traditional stovetop pancake is fraught with tension. It starts with noble intentions—a golden stack of morning perfection—but usually ends in a smoking kitchen, an unevenly cooked flapjack, and a deep sense of culinary defeat. The flip is the enemy. That moment of truth where you realize the batter stuck, or you’ve launched half of your breakfast onto the wall, is enough to send anyone straight back to toast. That’s why, when the universe delivered the solution to my pancake woes, it was a genuinely joyous occasion. We are moving beyond the flat, folks. We are embracing structure, stability, and supreme portability with these glorious Baked Protein Pancake Bowls.
The Tyranny of the Flip is Over
This recipe isn’t just about maximizing your protein intake; it’s about reclaiming your mornings. Imagine walking into the kitchen, not to the frantic sizzle of butter and the looming threat of a spatula disaster, but to the gentle aroma of vanilla and cinnamon wafting from the oven. These are not sad, dense, high-protein hockey pucks. Thanks to the magic of using molds—like silicone muffin top pans or small oven-safe ramekins—we force the batter into a supportive, concave shape. When the internal structure sets, you are left with a perfect little edible bowl, ready to hold yogurt, fruit, nuts, or frankly, just more maple syrup.
This method transforms the entire experience from a demanding cooking session into a relaxed, set-it-and-forget-it baking endeavor. It ensures that every single bite is evenly cooked, fluffy in the middle, and boasts slightly crispy edges. Plus, cleaning up is infinitely easier. Say goodbye to scraping dried batter off the stovetop; say hello to delicious, high-octane breakfast bowls that fuel your busy day without the mess.
The Science of the Fluff
The key to achieving magnificent fluffiness in these Baked Protein Pancake Bowls lies in the perfect marriage of dry ingredients and just enough moisture. We rely on the combination of a high-quality plant-based protein powder or plant-based protein powder mixed with flour and a good dose of baking powder. The oven’s heat surrounds the batter completely, causing the baking powder to activate vigorously and uniformly, lifting the entire structure into its desired bowl shape.
Unlike pan-frying, where heat is applied unevenly from the bottom up, baking provides a consistent temperature environment. This steady heat prevents the dreaded “raw center” and guarantees that the protein powder doesn’t suck all the moisture out before the bowl is fully cooked. We want a breakfast that feels substantial but doesn’t sit like a brick. The texture should be soft and cake-like, offering a delightful base for whatever toppings your heart desires.
Ingredients for Your Morning Masterpiece
Gathering your ingredients is the easiest part of this entire process. Most items are standard pantry staples, but ensure your protein powder is one you truly enjoy, as its flavor will be front and center in the finished product. We opt for basic, wholesome elements to keep the focus on flavor and nutrition.
- 1 cup all-purpose or oat flour
- 2 scoops (about 60g) vanilla or unflavored protein powder
- 2 teaspoons baking powder
- 1/2 teaspoon ground cinnamon (optional, but highly recommended)
- Pinch of salt
- 1 large egg or flax egg equivalent
- 1 cup milk (dairy or non-dairy options work perfectly)
- 1/4 cup maple syrup or preferred liquid sweetener
- 1 teaspoon pure vanilla bean paste
- 2 tablespoons neutral oil (like canola or light olive oil) or melted butter substitute
Step-by-Step Baking Nirvana
Following this simple method ensures success, even if your previous pancake attempts ended in scorched disaster zones. We keep the process minimal and efficient because mornings require speed and guaranteed results.
Preparing the Batter
- Preheat your oven to 375°F (190°C). Lightly grease your silicone muffin top pan or four individual oven-safe ramekins. Making sure they are properly coated is crucial to the bowl shape detaching cleanly.
- In a large mixing bowl, whisk together the flour, protein powder, baking powder, cinnamon (if using), and salt. Make sure there are no clumps of powder remaining.
- In a separate bowl, whisk together the egg, milk, maple syrup, vanilla bean paste, and oil. Ensure these wet ingredients are fully combined before moving on.
- Pour the wet mixture into the dry ingredients. Stir just until combined. Do not overmix; overmixing develops gluten and results in tough, chewy bowls. A few small lumps are perfectly acceptable.
Baking the Bowls
- Carefully divide the batter evenly among your prepared molds. If using a muffin top pan, the wells should be about two-thirds full. For ramekins, adjust according to size, aiming for a consistent thickness.
- Transfer the molds to the preheated oven. Bake for 15 to 18 minutes. The exact time will depend on the depth of your mold. The Baked Protein Pancake Bowls are ready when a toothpick inserted near the center comes out clean.
- Remove the bowls from the oven and let them cool in the molds for about five minutes. This cooling time allows the structure to set fully.
- Gently invert the molds or carefully run a knife around the edges of the ramekins to release the bowls.
- Serve immediately and fill with Greek yogurt, berries, or a drizzle of chocolate sauce. These bowls are delicious and totally customizable.
Chef’s Secrets for Flawless Baked Protein Pancake Bowls
These crucial pieces of advice come straight from the school of messy trial-and-error, so take notes. They are designed to save you time, effort, and ingredient waste, ensuring your baked protein bowls turn out perfectly every time.
- Use a high-quality silicone muffin top pan or ramekins; this prevents sticking and ensures those perfect bowl edges for maximum topping retention without tearing.
- Do not overmix the batter! A few small lumps of flour are perfectly acceptable and actually contribute to a lighter, more tender finished product when baked, ensuring peak fluffiness.
- If your specific brand of protein powder tends to dry out baked goods, consider adding an extra tablespoon of milk or a touch of unsweetened applesauce for guaranteed moistness and better texture.
My niece calls these “edible cereal bowls.” Once, she ate three just to prove she could fit an entire fruit salad inside the final product, showcasing their incredible versatility and appeal. It’s always a winner with the family.
Conclusion for Baked Protein Pancake Bowls
The quest for the perfect, high-protein breakfast ends here. Baked Protein Pancake Bowls revolutionize your morning routine by eliminating the stress of stovetop cooking and delivering consistently fluffy, portion-controlled results. Whether you are fueling up for a heavy workout or just need a delicious, fast meal, this recipe offers versatility and convenience.
Remember that the beauty of this dish lies in its adaptability—feel free to experiment with different flavorings and toppings to suit your cravings. Embrace the easy baking process and enjoy these structural masterpieces. They are truly the foundation for a delightful and nutritious start to any busy day.
Print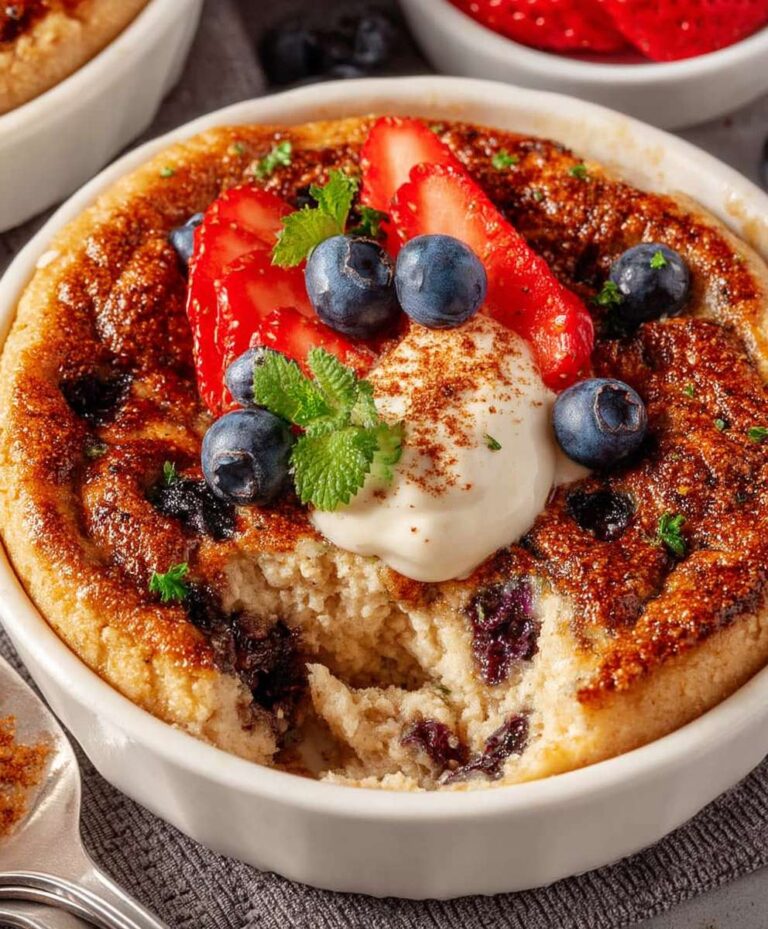
Baked Protein Pancake Bowls
Skip the skillet mess! These fluffy, vanilla-oat pancake bowls bake up perfectly light. High protein, minimal prep. Full instructions and macro breakdown included.
- Total Time: 35 minutes
- Yield: 4 servings
Ingredients
- Protein Powder (vanilla or unflavored): 1 scoop (approx. 30g)
- Rolled Oats (or quick oats): 1/2 cup
- Unsweetened Almond Milk: 1/2 cup
- Egg Whites: 2 large
- Baking Powder: 1 teaspoon
- Granulated Sweetener (or maple syrup substitute): 1 teaspoon
- Vanilla Bean Paste: 1/2 teaspoon
- Cinnamon: 1/4 teaspoon
Instructions
- Step 1: Preheat the oven to 350°F (175°C). Lightly grease two standard oven-safe ramekins or small ceramic bowls with non-stick spray or a dab of coconut oil.
Notes
- These store well in an airtight container in the fridge for up to 3 days, making them perfect for efficient meal prep breakfasts.
- Serve warm with your favorite toppings—a dollop of Greek yogurt, fresh berries, and a drizzle of sugar-free maple syrup complement the vanilla base beautifully.
- To refresh the texture of leftovers, reheat in the microwave for 30–45 seconds, or bake at 300°F (150°C) for a few minutes for a slightly crispier top.
- If using a highly absorbent protein powder, let the batter rest for five minutes before pouring into the ramekins to ensure the oats hydrate fully and prevent a dry, dense bowl.
- Prep Time: 15 minutes
- Cook Time: 20 minutes
- Method: Stovetop
- Cuisine: American
Nutrition
- Serving Size: 1 Baked Pancake Bowl
- Calories: 385
- Sodium: 300mg
- Fat: 8g
- Saturated Fat: 2.5g
- Trans Fat: 0g
- Protein: 4g


Leave a Comment