
Forget the dry, chalky chicken breasts of your past. We are here to unlock the secret to poultry perfection that requires minimal effort and maximum flavor payoff. Say hello to the ultimateAir Fryer Chicken Breast Recipe | Tender Juicy Healthy Dinner.
This incredibly simple method guarantees succulent results every time, transforming that staple protein into the star of your weeknight table with zero stress and rapid cleanup.
- This incredible preparation is lightning-fast, requiring only about twenty minutes from seasoning to plate, making it ideal for busy evenings.
- Experience a robust, savory flavor profile achieved through simple pantry spices that create a perfectly caramelized exterior crust.
- The finished chicken boasts a gorgeous golden-brown hue, ensuring a visually appealing centerpiece suitable for casual or formal dining.
- Enjoy this versatile protein sliced over salads, tucked into wraps, or served alongside roasted vegetables for a complete, nutritious meal.
The Culinary Comedy of Chronically Dry Chicken
We’ve all been there. You purchase beautiful, fresh chicken breasts, determined to eat healthily and prepare a simple dinner. You follow the recipe exactly—sear on the stovetop, finish in the oven—and yet, when you finally cut into the result, the texture resembles a block of compressed sawdust. You stare at the plate, wondering how something so promising ended up so tragically dry. For years, I avoided making chicken breast, convinced it was cursed to be boring, bland, and require a gallon of sauce just to swallow one bite. My family would politely chew the concrete poultry, offering vague praises while discreetly pushing pieces to the edges of their plates.
The main issue is that chicken breast is lean. While that leanness makes it a healthy choice, it also means it is mercilessly easy to overcook. A few extra minutes in the pan or oven, and boom—moisture evaporated, flavor deceased. The quest for the perfectly cooked, moist, and tender centerpiece became my Everest, and I was perpetually stuck at base camp, clutching a pile of sad, pale protein. Then, the air fryer arrived, a compact, countertop hero promising quick results and even cooking. I was skeptical; how could fast, circulating air possibly beat slow roasting? As it turns out, the air fryer doesn’t just beat traditional methods; it takes them behind the woodshed and gives them a stern talking-to about moisture retention.
Why the Air Fryer is Your New Best Friend
The magic of the air fryer lies in its powerful convection mechanism. It rapidly circulates extremely hot air, cooking the food quickly and evenly from all sides. This speed is the secret weapon against dry chicken. By significantly reducing the cooking time, the internal temperature of the chicken rises fast enough to cook the meat through before all the natural juices have time to escape. Furthermore, the circulating air creates a stunningly crisp exterior texture, often mistaken for pan-searing, even though you used minimal oil.
This appliance demands respect because it changes the game. It allows you to achieve that elusive combination: a perfectly golden exterior and a succulent, nearly buttery interior. If you still own a dusty kitchen gadget that promises easy cooking but mostly delivers disappointment, give it away and make space for this genius machine. Learning this method means you never have to serve tragically dry chicken again. This appliance isn’t just a trend; it’s an essential tool for creating a truly tender, juicy healthy dinner quickly and efficiently.
Ingredients for Air Fryer Chicken Breast Recipe | Tender Juicy Healthy Dinner
Here’s what you’ll need to make this delicious dish:
- Boneless, Skinless Chicken BreastsChoose even-sized pieces, ideally 6–8 ounces each, for uniform cooking and easy preparation.
- Olive OilA tablespoon helps the seasoning adhere beautifully to the chicken and assists in achieving a deep golden crust.
- Smoked PaprikaThis spice adds a beautiful color and a savory, subtle smokiness that elevates the standard chicken flavor profile.
- Garlic Powder and Onion PowderThese foundational spices are essential for building layers of savory depth without adding excessive moisture during cooking.
- Dried Thyme or OreganoA small amount of dried herb brings an aromatic, earthy note that complements the robust spices perfectly.
- Salt and Freshly Ground Black PepperThese are non-negotiable for flavor enhancement; be generous, seasoning is key to preventing bland results.
The full ingredients list, including measurements, is provided in the recipe card directly below.
How to Make Air Fryer Chicken Breast Recipe | Tender Juicy Healthy Dinner
Follow these simple steps to prepare this delicious dish:
Step 1: Preparation and Seasoning
Pat the chicken breasts completely dry using paper towels; removing surface moisture helps achieve a better crust. In a small bowl, combine all the dry seasonings: smoked paprika, garlic powder, onion powder, thyme, salt, and pepper. Drizzle the chicken breasts with olive oil, ensuring they are lightly coated, then rub the spice mixture generously over all surfaces.
Step 2: Preheat the Air Fryer
Preheat your air fryer to 380°F (195°C) for at least five minutes. Preheating is crucial because placing the chicken in a hot basket ensures the cooking process starts immediately, sealing in those precious juices and leading to the best texture.
Step 3: Arrange the Chicken
Place the seasoned chicken breasts in the air fryer basket in a single layer. Do not overlap the pieces, as overcrowding will trap moisture and result in steaming instead of crisping. Depending on the size of your machine, you might need to cook the chicken in batches.
Step 4: The Initial Cook
Cook the chicken at 380°F (195°C) for 6–8 minutes. When the time is up, carefully flip the chicken breasts using tongs. Flipping ensures both sides develop that desirable golden-brown exterior and cook through evenly.
Step 5: Finishing the Cook
Continue cooking for an additional 6–10 minutes, depending on the thickness of the meat. The total cooking time for an average 6-ounce chicken breast is typically between 14 and 18 minutes. Always use a meat thermometer inserted into the thickest part; the chicken is safely done when it reaches an internal temperature of 165°F (74°C).
Step 6: Rest and Serve
Immediately remove the cooked chicken from the air fryer and place it on a cutting board. Crucially, let the chicken rest for 5–10 minutes before slicing or serving. This resting period allows the muscle fibers to relax and redistribute the juices, guaranteeing a moist interior. Transfer to plates and serve alongside mashed sweet potatoes or a vibrant green salad for the perfect finishing touch.
Tips for Achieving Tender, Juicy Results Every Time
While the air fryer does most of the heavy lifting, mastering this technique involves a few chef-level secrets to ensure maximum succulence. The difference between good chicken and great chicken often comes down to these tiny adjustments, proving that attention to detail makes all the difference in the kitchen.
Pound the Breasts for Even Thickness
If your chicken breasts are very thick or unevenly shaped, take a moment to pound them lightly. Place the chicken between two sheets of plastic wrap and use a rolling pin or the flat side of a meat tenderizer until the breast is roughly uniform in thickness, usually about three-quarters of an inch. Even thickness prevents thinner edges from drying out while the thicker center finishes cooking, ensuring a perfectly tender result across the entire piece.
Never Skip the Resting Period
The single biggest mistake people make when cooking any protein is slicing it immediately. When chicken finishes cooking, the internal juices rush toward the center. If you cut it right away, those precious juices pour out onto the cutting board, leaving the meat dry. By allowing the chicken to rest for a minimum of five minutes, you allow the juices to settle back into the meat, ensuring that every bite remains juicy and flavorful.
The Power of Temperature
If you don’t own a reliable instant-read meat thermometer, stop everything and buy one. Guessing the doneness of chicken is the primary cause of dry meat. Once the thermometer reads 165°F (74°C) in the thickest part, the chicken is done. The key here is to pull it out immediately, even if it seems like it hasn’t reached that golden-brown color yet. Remember, the internal temperature will continue to rise slightly (carryover cooking) during the resting period.
Frequently Asked Questions (FAQs)
Can I use frozen chicken breasts in the air fryer?
While technically possible, you should avoid using frozen chicken breasts for this specific recipe. Starting with thawed chicken is essential to ensure rapid, even cooking and proper seasoning adhesion. If you must use frozen, extend the preheating time and check the internal temperature frequently.
What if my chicken breasts are much larger or smaller than average?
Adjust the cooking time accordingly. For very thick, large breasts (over 8 ounces), you might need to decrease the temperature slightly to 370°F (188°C) and increase the cooking time to ensure the center cooks before the exterior burns. Always rely on the internal temperature rather than time alone.
How do I prevent the chicken from sticking to the air fryer basket?
Ensure you lightly mist or brush the air fryer basket with a high smoke point oil like avocado or canola oil before adding the chicken. Never use non-stick spray in aerosol cans directly on the basket, as it can damage the non-stick coating over time.
How long can I store leftover air fryer chicken?
You can store leftover cooked chicken breast in an airtight container in the refrigerator for 3 to 4 days. This chicken is excellent for meal prepping and tastes fantastic cold, sliced onto salads or warmed gently for quick sandwiches.
Perfecting the Cooking Process

Achieving the perfect outcome requires sequence mastery. While the chicken breasts rest after their air fryer session, utilize those five minutes efficiently. This is the ideal window to plate your side dishes, toss a fresh garden salad, or whip up a quick pan sauce for drizzling, ensuring your entire Air Fryer Chicken Breast Recipe meal hits the table piping hot and ready for devouring.
Add Your Touch
You can easily adapt this recipe to fit any flavor profile imaginable. Swap the smoked paprika blend for a bright lemon-herb seasoning, or use a sweet and savory BBQ rub for a caramelized crust. Try stuffing the breasts with spinach and feta before cooking, or slice them into thin strips to make incredibly quick and delicious air fryer chicken tenders.
Storing & Reheating
Store leftover chicken in an airtight container in the refrigerator for up to four days. For reheating, use the air fryer at 350°F (175°C) for 4 to 6 minutes. Wrapping the pieces loosely in foil helps maintain maximum moisture and prevents the meat from drying out, ensuring the chicken remains perfectly tender.
I remember serving this dish the first time to my notoriously picky brother, David. He took one bite, paused dramatically, and asked if I had secretly hired a gourmet chef. That genuine surprise made every minute of experimentation worthwhile!
- Ensure the chicken breasts are of similar size and thickness before seasoning; uneven pieces result in inconsistent cooking and potential dryness.
- Do not overcrowd the air fryer basket; cook in batches if necessary, allowing enough space for the hot air to circulate freely around the chicken.
- If your air fryer lacks a preheat function, run it empty at the required temperature for five minutes to guarantee the best initial sear and flavor crust.
The Quest for Truly Moist Chicken
For years, chicken breast held a grudge against me. Every time I cooked it, the resulting slab resembled particleboard—dry, flavorless, and requiring an entire river of sauce just to chew it down. It was a culinary tragedy, a protein source that tasted suspiciously like defeat. My family started eyeing the take-out menus whenever I announced “chicken night.” I tried brining, pounding, slow-cooking, and even reciting poetry to the raw poultry, yet the results remained tragically underwhelming. Then, a gleaming metallic beast entered my life: the air fryer. This small appliance, often relegated to making frozen french fries, revolutionized my approach to poultry, delivering consistently tender, juicy, and flavorful results every single time. Forget the complicated techniques; this simple Air Fryer Chicken Breast Recipe promises a healthy dinner that tastes anything but boring.
Why the Air Fryer Changes Everything
The secret lies in the rapid, circulating super-heated air. Unlike baking or pan-frying, which can unevenly cook the exterior while drying out the center, the air fryer acts like a miniature convection oven on steroids. It crisps the outside quickly, locking in the natural moisture before it has a chance to evaporate. This method is incredibly efficient, resulting in a perfect meal prep staple or a speedy weeknight centerpiece. If you thought achieving a truly tender chicken breast was a myth reserved only for restaurant chefs, prepare to be proven delightfully wrong. We are going to transform that humble piece of white meat into a culinary superstar. This approach is fantastic for anyone seeking a quick, healthy, and high-protein option for their table.
Gathering Your Ingredients
The beauty of this recipe lies in its simplicity. We rely on classic pantry staples to enhance the natural flavor of the chicken without overpowering it. Always aim for uniform thickness in your chicken breasts—if they are very thick on one end, a quick pound with a meat mallet (or a heavy rolling pin) ensures even cooking and prevents one side from drying out while the other side finishes.
For the ultimate Tender Juicy Healthy Dinner:
- 2 large boneless, skinless chicken breasts (about 6-8 oz each)
- 1 tablespoon olive oil (or avocado oil)
- 1 teaspoon smoked paprika
- 1 teaspoon garlic powder
- 1/2 teaspoon onion powder
- 1/2 teaspoon dried thyme or oregano
- 1/2 teaspoon salt
- 1/4 teaspoon black pepper
- A pinch of cayenne pepper (optional, for a kick)
Simple Steps to Tender Perfection
Following these steps guarantees the best results. Remember, the internal temperature is the ultimate judge of doneness, so invest in a meat thermometer if you haven’t already. It’s the difference between juicy success and regrettable dryness.
- Prep the Chicken:Pat the chicken breasts thoroughly dry using paper towels. Moisture is the enemy of crispness and flavor adhesion. If the breasts are uneven, lightly pound them to about 3/4 to 1 inch thickness.
- Season Generously:In a small bowl, combine the olive oil, smoked paprika, garlic powder, onion powder, thyme, salt, pepper, and cayenne (if using). Rub the mixture thoroughly all over the chicken breasts, ensuring they are completely coated.
- Preheat the Air Fryer:Preheat your air fryer to 375°F (190°C) for about 5 minutes. This step is crucial for achieving immediate searing and better texture.
- Cook Time:Place the seasoned chicken breasts in the air fryer basket in a single layer, ensuring they are not overlapping. Cook for 8 minutes.
- Flip and Finish:Flip the chicken breasts and continue cooking for another 6 to 9 minutes, depending on the thickness. Use a meat thermometer to check the internal temperature; it should reach 165°F (74°C) in the thickest part.
- Rest is Best:Remove the chicken immediately and let it rest on a cutting board, lightly tented with foil, for 5 minutes. This resting period allows the internal juices to redistribute, guaranteeing an unbelievably tender result. Slice and serve!
Mastering the Internal Temperature: A Safety Check
While the visual appearance of the chicken can be tempting, relying solely on sight to determine doneness is a rookie mistake that leads straight to dry, chewy meat. A reliable instant-read thermometer is your best friend in the kitchen, particularly when dealing with poultry. The USDA recommends cooking chicken to an internal temperature of 165°F (74°C). When checking, insert the thermometer into the thickest part of the breast, avoiding any bone if present. Pulling the chicken at exactly 165°F ensures peak juiciness. Remember that carryover cooking—where the internal temperature rises slightly after removal—will help solidify the final texture while resting.
Many home cooks make the mistake of leaving the chicken in until it hits 170°F or higher, just to be safe. While safe, this extra margin leads to moisture loss. Trust your thermometer, pull it promptly, and let the rest time finish the job. This simple act of precision elevates this easy Air Fryer Chicken Breast Recipe from good to legendary. Precision is paramount when seeking a truly tender and juicy result.
Choosing the Right Marinade Alternatives
While the dry rub we used is fantastic for creating a flavorful crust, sometimes you crave a deeply marinated flavor. If you choose to marinate, remember that excessive liquid can steam the chicken rather than crisping it in the air fryer. The key is to use a thick, relatively low-liquid marinade or pat the chicken completely dry after marinating but before applying a light coat of oil and seasoning.
For a refreshing Mediterranean flavor, try a yogurt and lemon juice marinade (remembering to scrape off excess yogurt before cooking). If you prefer something tangy and sweet, use a mixture of apple cider vinegar, honey, garlic, and soy sauce (or tamari for a gluten-free option). Always limit marinating time for chicken breast to 30 minutes to 4 hours; prolonged exposure to acidic ingredients can actually start to break down the proteins too much, leading to a mushy texture instead of the desired tenderness.
Serving Suggestions for a Complete Meal
This versatile protein anchors a wide variety of meals, making it ideal for a quick and healthy dinner. Since the air fryer is so fast, you can focus your remaining efforts on crafting excellent side dishes. The mild flavor profile of this perfectly cooked chicken breast pairs well with almost anything.
- Starchy Sides:Serve alongside fluffy quinoa pilaf mixed with fresh parsley and pine nuts, or try a vibrant brown rice medley. If you crave comfort, pair it with mashed potatoes prepared with vegetable broth instead of heavy cream.
- Vegetable Focus:For maximum health points, consider air-frying some broccoli or Brussels sprouts right after the chicken. A simple squeeze of lemon or balsamic glaze over roasted asparagus also complements the smoky paprika rub beautifully.
- Salads and Bowls:Slice the chicken and arrange it atop a hearty Caesar salad (using homemade egg-free dressing) or chop it up for incredible protein bowls featuring leafy greens, black beans, corn, and a vibrant lime vinaigrette.
Troubleshooting Common Air Fryer Issues
Even seasoned cooks run into hiccups occasionally. If your chicken isn’t turning out exactly as planned, here are the most likely culprits and how to fix them, ensuring your Air Fryer Chicken Breast Recipe results in that perfect tender, juicy, healthy dinner you crave.
Issue 1: Dry Chicken:The most common problem. You likely cooked it too long, or the breasts were highly unevenly sized. Always rely on the thermometer, aim for 165°F, and ensure your chicken is uniform in thickness before cooking. Resting time is also mandatory for juice retention.
Issue 2: Uneven Browning:This happens when the basket is overcrowded. Air fryers need space for circulation. If you are cooking more than two large breasts, use the air fryer in two separate batches. Flipping the chicken halfway through, as specified in the recipe, is also vital for consistent color.
Issue 3: Seasoning Falling Off:If your seasoning disappears during the cooking process, the chicken might have been too wet when you applied the rub, or you didn’t use enough oil to adhere the spices properly. Patting the chicken dry initially and using a light oil layer is key to achieving that beautiful crust.
The air fryer truly represents a gateway to easier, cleaner, and faster cooking. Once you master this incredibly simple technique for producing a consistently tender juicy healthy dinner, you will find yourself reaching for chicken breast far more often. Enjoy the journey of flawless, flavorful poultry!
Frequently Asked Questions About Air Fryer Chicken
How long does it take to cook an average chicken breast in the air fryer?
A standard 6 to 8-ounce chicken breast cooked at 375°F (190°C) typically takes between 14 and 17 minutes total. However, always confirm doneness using an instant-read thermometer to ensure the thickest part reaches 165°F (74°C).
Do I need to spray oil on the air fryer basket?
While the chicken itself is coated in oil, lightly spraying the basket with non-aerosol cooking spray can help prevent sticking, especially if your air fryer basket is older or scratched. Avoid traditional aerosol sprays as they can damage the non-stick coating.
Can I cook frozen chicken breasts in the air fryer?
Yes, you can cook frozen breasts, but the cooking time will nearly double (around 25–30 minutes) and the texture might be slightly less tender. If starting from frozen, use a lower temperature initially (360°F or 180°C) for 10 minutes before raising it to 375°F (190°C) to prevent the exterior from burning before the inside thaws.
What temperature is best for air fryer chicken breast?
Cooking at 375°F (190°C) is generally ideal for chicken breast. This temperature is high enough to achieve a fantastic exterior sear and color quickly, preventing the interior from drying out, which is key for a truly tender juicy healthy dinner result.
Should I cover the chicken breast when air frying?
No, covering the chicken breast with foil or a lid defeats the purpose of the air fryer, which relies on direct, circulating dry heat to crisp the exterior. Always leave the chicken uncovered to ensure optimal air circulation and crisping.
Conclusion for Air Fryer Chicken Breast Recipe | Tender Juicy Healthy Dinner
We conquered the dreaded dry chicken, transforming a humble ingredient into a culinary masterpiece using nothing but hot air and a few glorious spices. This Air Fryer Chicken Breast Recipe delivers on its promise: it is genuinely tender, unbelievably juicy, and forms the centerpiece of a healthy dinner that requires minimal effort. Whether you are a weeknight warrior looking for speed or a dedicated chef seeking perfection, the air fryer is your new best friend. Ditch the long cooking times and embrace the quick, clean power of the air fryer—your taste buds and your schedule will thank you.
Print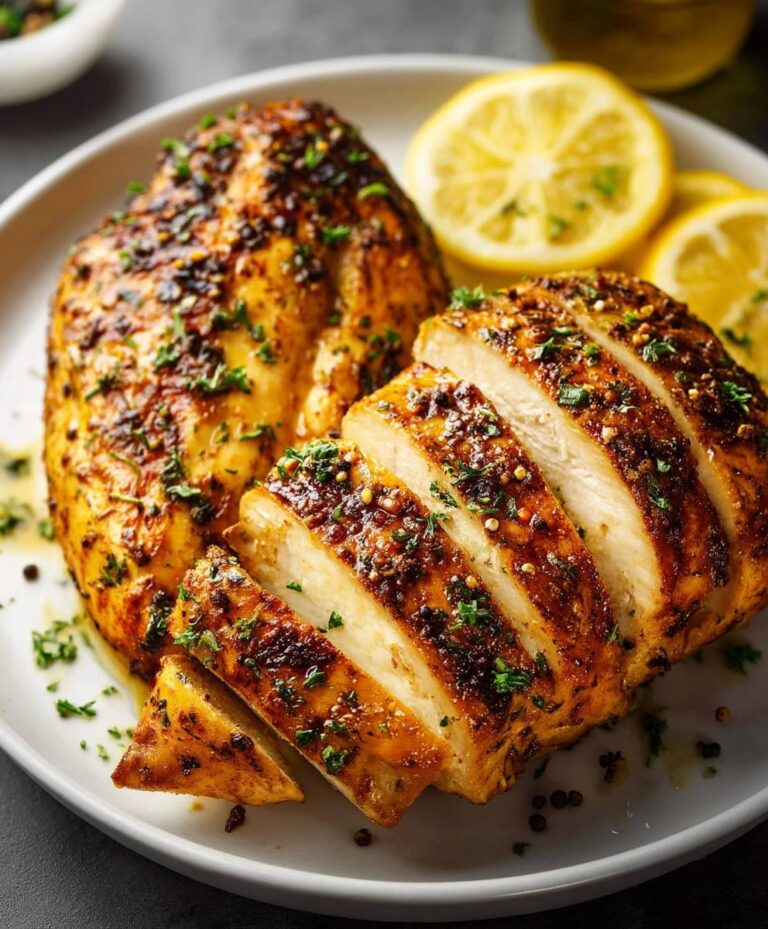
Air Fryer Chicken Breast Recipe | Tender Juicy Healthy Dinner
The ultimate healthy weeknight meal: perfectly cooked, oil-massaged chicken breasts infused with Italian herbs and garlic powder.
- Total Time: 35 minutes
- Yield: 4 servings 1x
Ingredients
- 2 medium boneless, skinless chicken breasts (about 6–8 oz each)
- 1 tablespoon olive oil
- 1 teaspoon kosher salt
- 1/2 teaspoon black pepper
- 1 teaspoon garlic powder
- 1 teaspoon smoked paprika
- 1/2 teaspoon onion powder
- 1/2 teaspoon dried Italian herbs
Instructions
- Step 1: Combine the kosher salt, black pepper, garlic powder, smoked paprika, onion powder, and Italian herbs in a small bowl. Pat the chicken breasts dry with a paper towel.
- Step 2: Drizzle the olive oil evenly over both sides of the chicken breasts. Then, rub the spice mixture generously onto all surfaces of the chicken, ensuring they are fully coated.
- Step 3: Preheat your air fryer to 380°F (195°C) for about 5 minutes. Place the seasoned chicken breasts in the air fryer basket in a single layer, ensuring they do not overlap.
- Step 4: Air fry for 6-8 minutes. Carefully flip the chicken breasts using tongs and cook for an additional 4-6 minutes, or until the internal temperature reaches 165°F (74°C) using a meat thermometer.
- Step 5: Once cooked, immediately remove the chicken from the air fryer basket and place them on a cutting board. Tent loosely with foil and allow the chicken breasts to rest for 5-10 minutes before slicing and serving.
Notes
- Store leftover sliced chicken in a sealed container for up to 3 days, perfect for meal prepping quick lunches or future salads.
- To prevent dry leftovers, reheat sliced chicken gently in the air fryer at 300°F for just 2-3 minutes, perhaps wrapped loosely in foil for maximum moisture retention.
- Slice the rested chicken breast and serve immediately over a bed of fresh greens or alongside roasted vegetables and a bright lemon vinaigrette.
- For maximum juiciness, always use a reliable meat thermometer to ensure the internal temperature hits exactly 165°F, and do not skip the crucial 5-10 minute tented rest afterward.
- Prep Time: 15 minutes
- Cook Time: 20 minutes
- Method: Stovetop
- Cuisine: American
Nutrition
- Serving Size: 1 boneless, skinless chicken breast (approx. 4 oz cooked)
- Calories: 235
- Sodium: 480mg
- Fat: 7.5g
- Saturated Fat: 1.6g
- Trans Fat: 0g
- Protein: 0g
FAQs
Why does my chicken always dry out in the air fryer?
The secret to avoiding the infamous “chicken sawdust” texture is twofold: perfect temperature and timing. Most people overcook the breast, thinking it needs longer. Use a meat thermometer—you are aiming for exactly 165°F (74°C). Furthermore, ensure you lightly coat your chicken in olive oil or cooking spray; this barrier seals the moisture in, guaranteeing a remarkably tender and juicy chicken breast. Don’t crowd the basket; cook in batches if necessary for optimal air circulation and even results. This simple adjustment ensures your Air Fryer Chicken Breast Recipe results in a fantastic, moist healthy dinner.
How long does it take to cook an average size chicken breast for a healthy dinner?
Cooking time varies slightly depending on the thickness of the chicken breast, but a standard 6-ounce fillet usually requires about 12 to 16 minutes at 380°F (193°C). Always flip the chicken halfway through the cooking cycle to promote beautiful, even browning and crisping on both sides. Remember, if your breast is extremely thick, consider butterflying it slightly or pounding it to an even thickness first. Consistency is key for achieving that reliably tender and juicy center, making this method ideal for a quick, healthy weeknight meal.
Can I prep the chicken ahead of time for this tender juicy healthy dinner?
Absolutely, pre-prepping is the ultimate time-saver for busy weeknights. You can season the raw chicken breasts up to 24 hours in advance and store them covered in the refrigerator. The longer the seasoning sits, the more flavorful and tender your final product will be, as the dry rub acts as a quick marinade. When you are ready to cook, simply take the seasoned chicken out, let it sit at room temperature for about 10 minutes, and then pop it into the air fryer. This preparation guarantees a hassle-free, perfectly cooked Air Fryer Chicken Breast Recipe.
What is the best way to get a crispy exterior on the Air Fryer Chicken Breast Recipe?
Achieving a wonderfully crispy, golden exterior requires balancing moisture and coating. Pat the chicken completely dry before applying any oil or seasoning. Moisture is the enemy of crispiness! Next, ensure you use a light coating of oil spray or toss the chicken lightly in oil. If you want extreme crispiness, consider adding a tablespoon of cornstarch or baking powder to your dry rub—this helps wick away surface moisture during cooking. Following these steps ensures your chicken breast doesn’t just taste good, it gets that coveted, satisfying outer crunch.


Leave a Comment