
Grilled Cheese Roll Ups: A Fun Twist on a Classic Favorite
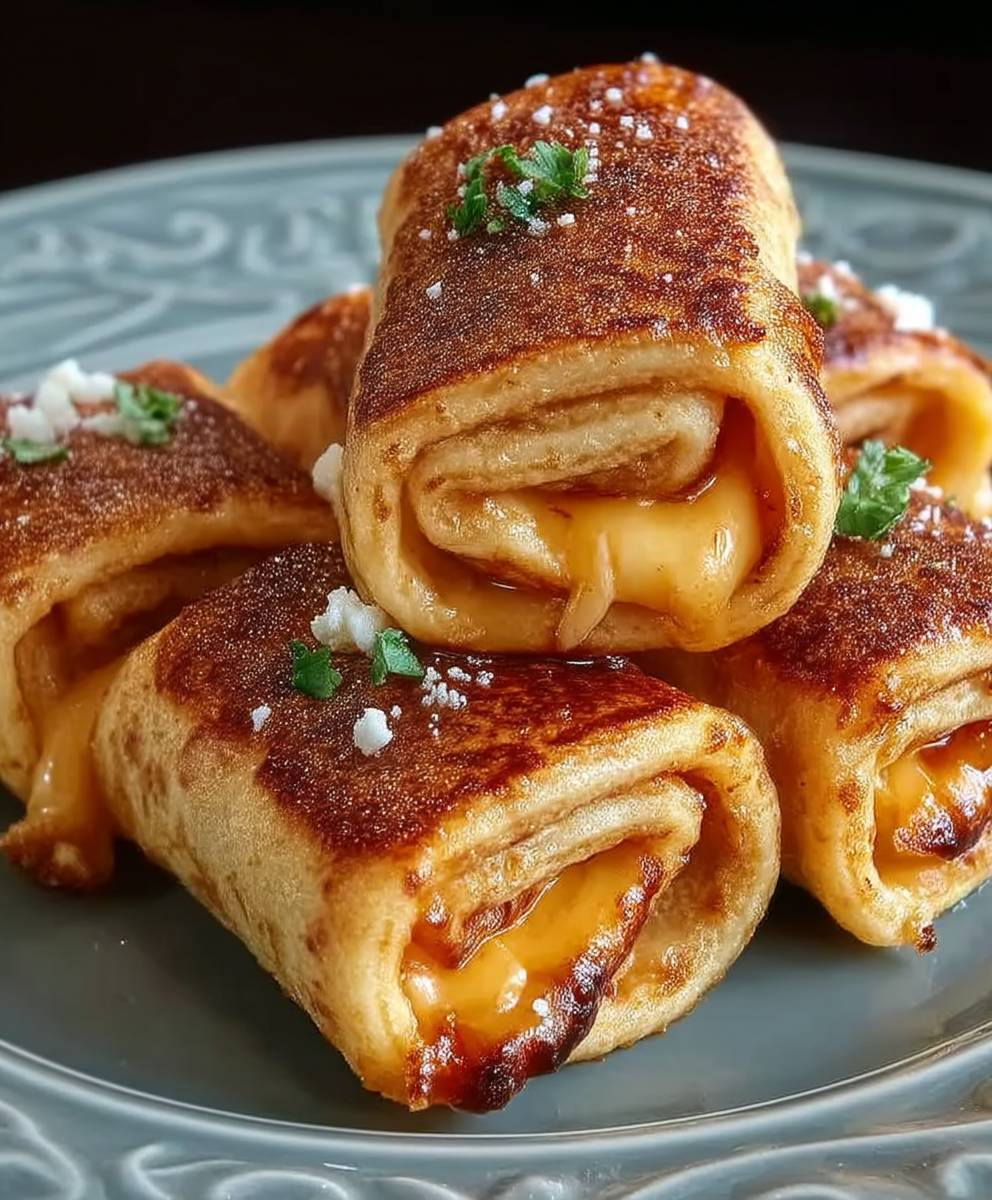
Grilled Cheese Roll Ups are not just a meal; they are a delightful experience that brings joy to both kids and adults alike. Imagine biting into a crispy, golden exterior that gives way to a gooey, melty cheese center, all wrapped up in a fun, portable roll. This dish takes the beloved grilled cheese sandwich and transforms it into a playful, easy-to-eat treat that’s perfect for lunchboxes, snacks, or even a quick dinner.
The history of grilled cheese sandwiches dates back to the 1920s, but the roll-up version is a modern twist that has gained popularity in recent years, especially among families looking for creative ways to enjoy classic flavors. People love Grilled Cheese Roll Ups not only for their irresistible taste and texture but also for their convenience. They are quick to prepare, making them an ideal choice for busy weeknights or impromptu gatherings.
Whether you’re dipping them in tomato soup or enjoying them on their own, Grilled Cheese Roll Ups are sure to become a favorite in your household. So, let’s dive into this delicious recipe and discover how to make these cheesy delights at home!

Ingredients:
- 8 slices of bread (white or whole wheat)
- 8 slices of cheese (cheddar, American, or your favorite)
- 4 tablespoons of butter, softened
- 1 teaspoon of garlic powder (optional)
- 1 teaspoon of dried parsley (optional)
- Salt and pepper to taste
Preparing the Roll Ups
- Start by laying out your slices of bread on a clean surface. You can use a cutting board or a large plate.
- Using a rolling pin, gently flatten each slice of bread. This will help the bread roll up more easily and create a nice texture.
- Once flattened, place a slice of cheese on each piece of bread. Make sure to center the cheese so that it doesn’t spill out when you roll it up.
- Carefully roll each slice of bread tightly around the cheese, starting from one end and rolling to the other. Make sure the cheese is fully enclosed within the bread.
- To secure the roll, you can use a toothpick or simply press the seam down gently. If you’re using toothpicks, make sure to remove them before serving.
Preparing the Butter Mixture
- In a small bowl, combine the softened butter, garlic powder, dried parsley, salt, and pepper. Mix well until all ingredients are fully incorporated.
- Spread a thin layer of the butter mixture on the outside of each roll-up. This will give them a delicious golden-brown crust when grilled.
Cooking Process
- Heat a large skillet or frying pan over medium heat. You want it hot enough to grill the roll-ups but not so hot that they burn.
- Once the skillet is hot, place the roll-ups seam side down in the pan. Make sure not to overcrowd the pan; you may need to cook them in batches.
- Cook the roll-ups for about 2-3 minutes on one side, or until they are golden brown and crispy. Use a spatula to gently flip them over.
- After flipping, cook for another 2-3 minutes on the other side. Keep an eye on them to ensure they don’t burn.
- Once both sides are golden brown and the cheese is melted, remove the roll-ups from the skillet and place them on a paper towel-lined plate to absorb any excess butter.
Assembling and Serving
- After all the roll-ups are cooked, you can slice them into bite-sized pieces if you prefer. This makes them perfect for dipping!
- Serve the grilled cheese roll-ups warm with your favorite dipping sauces. Some great options include marinara sauce, ranch dressing, or even a spicy mustard.
- Enjoy your delicious grilled cheese roll-ups as a snack, appetizer, or even a fun meal for kids and adults alike!
Tips for Perfect Grilled Cheese Roll Ups
- Cheese Choices: Feel free to experiment with different types of cheese. Mozzarella, pepper jack, or a blend of cheeses can add unique flavors.
- Herbs and Spices: You can customize the butter mixture with your favorite herbs and spices. Try adding Italian seasoning, paprika, or even a pinch of cayenne for some heat.
- Make Ahead: You can prepare the roll-ups ahead of time and store them in the refrigerator. Just grill them when you’re ready to serve.
- Air Fryer Option: If you have an air fryer, you can cook these roll-ups in it for a healthier version. Set the air fryer to 375°F (190°C) and cook for about 5-7 minutes, flipping halfway through.
Variations to Try
- Veggie Loaded: Add some thinly sliced vegetables like bell peppers, spinach, or tomatoes inside the roll-ups for added nutrition and flavor.
- Meat Lovers: Include slices of ham, turkey, or bacon for a heartier version of the roll-ups
Conclusion:
If you’re looking for a fun and delicious twist on a classic favorite, these Grilled Cheese Roll Ups are an absolute must-try! Not only do they deliver that gooey, cheesy goodness we all crave, but they also bring a playful element to your meal that both kids and adults will love. The crispy exterior combined with the melty cheese inside creates a delightful texture that is simply irresistible. Plus, they are incredibly easy to make, making them perfect for a quick lunch, a snack, or even a party appetizer.
When it comes to serving suggestions, the possibilities are endless! You can pair these Grilled Cheese Roll Ups with a warm bowl of tomato soup for a nostalgic combination that never goes out of style. Alternatively, consider serving them with a side of marinara sauce for a fun dipping experience that adds a burst of flavor. For a more gourmet touch, try adding some fresh herbs or spices to the cheese mixture, such as basil or garlic powder, to elevate the taste. You could even experiment with different types of cheese—think sharp cheddar, creamy mozzarella, or tangy pepper jack—to create your own signature roll ups.
If you’re feeling adventurous, why not try some variations? You could add cooked bacon or ham for a heartier option, or even incorporate vegetables like spinach or roasted red peppers for a healthier twist. For those with a sweet tooth, consider making dessert roll ups by using Nutella or cream cheese with fruit, then frying them until golden brown. The versatility of this recipe means you can customize it to suit your taste preferences or dietary needs.
I encourage you to give these Grilled Cheese Roll Ups a try! They are not only a delightful treat but also a fantastic way to bring some creativity into your kitchen. Once you’ve made them, I would love to hear about your experience! Share your thoughts, any variations you tried, or even photos of your delicious creations. Your feedback not only inspires me but also helps others discover the joy of making these tasty roll ups. So grab your ingredients, roll up your sleeves, and let’s get cooking! You won’t regret it!
Grilled Cheese Roll Ups: A Delicious Twist on a Classic Favorite
These Grilled Cheese Roll-Ups are a fun twist on the classic sandwich, featuring gooey cheese wrapped in soft bread and grilled to golden perfection. Perfect for kids and adults, they make a delightful snack or appetizer, especially when served with your favorite dipping sauces.
Ingredients
- 8 slices of bread (white or whole wheat)
- 8 slices of cheese (cheddar, American, or your favorite)
- 4 tablespoons of butter, softened
- 1 teaspoon of garlic powder (optional)
- 1 teaspoon of dried parsley (optional)
- Salt and pepper to taste
Instructions
- Start by laying out your slices of bread on a clean surface. You can use a cutting board or a large plate.
- Using a rolling pin, gently flatten each slice of bread. This will help the bread roll up more easily and create a nice texture.
- Once flattened, place a slice of cheese on each piece of bread. Make sure to center the cheese so that it doesn’t spill out when you roll it up.
- Carefully roll each slice of bread tightly around the cheese, starting from one end and rolling to the other. Make sure the cheese is fully enclosed within the bread.
- To secure the roll, you can use a toothpick or simply press the seam down gently. If you’re using toothpicks, make sure to remove them before serving.
- In a small bowl, combine the softened butter, garlic powder, dried parsley, salt, and pepper. Mix well until all ingredients are fully incorporated.
- Spread a thin layer of the butter mixture on the outside of each roll-up. This will give them a delicious golden-brown crust when grilled.
- Heat a large skillet or frying pan over medium heat. You want it hot enough to grill the roll-ups but not so hot that they burn.
- Once the skillet is hot, place the roll-ups seam side down in the pan. Make sure not to overcrowd the pan; you may need to cook them in batches.
- Cook the roll-ups for about 2-3 minutes on one side, or until they are golden brown and crispy. Use a spatula to gently flip them over.
- After flipping, cook for another 2-3 minutes on the other side. Keep an eye on them to ensure they don’t burn.
- Once both sides are golden brown and the cheese is melted, remove the roll-ups from the skillet and place them on a paper towel-lined plate to absorb any excess butter.
- After all the roll-ups are cooked, you can slice them into bite-sized pieces if you prefer. This makes them perfect for dipping!
- Serve the grilled cheese roll-ups warm with your favorite dipping sauces. Some great options include marinara sauce, ranch dressing, or even a spicy mustard.
- Enjoy your delicious grilled cheese roll-ups as a snack, appetizer, or even a fun meal for kids and adults alike!
Notes
- Cheese Choices: Feel free to experiment with different types of cheese. Mozzarella, pepper jack, or a blend of cheeses can add unique flavors.
- Herbs and Spices: You can customize the butter mixture with your favorite herbs and spices. Try adding Italian seasoning, paprika, or even a pinch of cayenne for some heat.
- Make Ahead: You can prepare the roll-ups ahead of time and store them in the refrigerator. Just grill them when you’re ready to serve.
- Air Fryer Option: If you have an air fryer, you can cook these roll-ups in it for a healthier version. Set the air fryer to 375°F (190°C) and cook for about 5-7 minutes, flipping halfway through.
Leave a Comment