
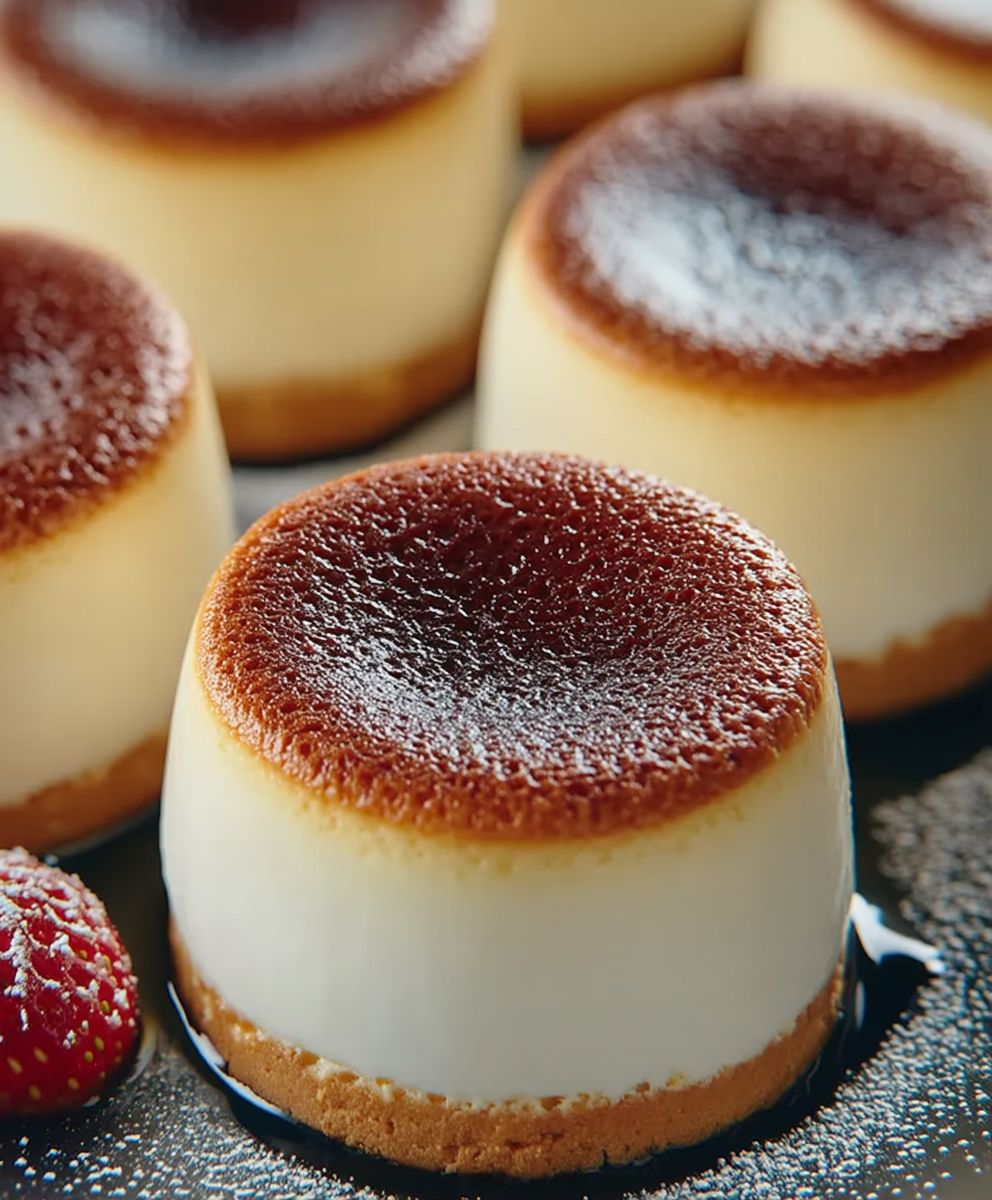
Mini Japanese Cheesecakes: A Delightful Treat
Mini Japanese Cheesecakes are a delightful fusion of lightness and creaminess that will transport your taste buds straight to Japan. These airy desserts, often referred to as “soufflé cheesecakes,” have gained immense popularity for their unique texture and subtle sweetness. Originating from the Land of the Rising Sun, these cheesecakes have a rich history that reflects Japan’s love for delicate flavors and innovative culinary techniques.
What makes Mini Japanese Cheesecakes so beloved is their fluffy texture that melts in your mouth, combined with a hint of tanginess from the cream cheese. They are not only delicious but also incredibly convenient to make, allowing you to impress your friends and family with minimal effort. Whether enjoyed as a light dessert after dinner or a sweet snack with tea, these mini cheesecakes are sure to become a favorite in your household. Join me as we explore the simple yet rewarding process of creating these delightful treats!

Ingredients:
- 8 oz (225 g) cream cheese, softened
- 1/2 cup (100 g) granulated sugar
- 1/4 cup (60 ml) milk
- 1/4 cup (60 ml) heavy cream
- 2 large eggs
- 1 teaspoon vanilla extract
- 1 tablespoon lemon juice
- 1/4 cup (30 g) all-purpose flour
- 1/4 teaspoon baking powder
- Pinch of salt
- Butter, for greasing the muffin tin
Preparing the Batter
- Preheat the oven: Start by preheating your oven to 320°F (160°C). This ensures that the oven is at the right temperature when you’re ready to bake your cheesecakes.
- Prepare the muffin tin: Grease a 12-cup muffin tin with butter. You can also use paper liners if you prefer an easier cleanup. Make sure to grease the liners as well to prevent sticking.
- Mix the cream cheese: In a large mixing bowl, add the softened cream cheese. Using an electric mixer, beat the cream cheese on medium speed until it’s smooth and creamy, about 2-3 minutes. This step is crucial for a lump-free batter.
- Add sugar: Gradually add the granulated sugar to the cream cheese while continuing to mix. Beat until the mixture is well combined and fluffy, about another 2 minutes.
- Incorporate wet ingredients: Pour in the milk and heavy cream. Mix on low speed until just combined. Then, add the eggs one at a time, mixing well after each addition. This helps to incorporate air into the batter, making the cheesecakes light and fluffy.
- Add flavorings: Stir in the vanilla extract and lemon juice. These ingredients will enhance the flavor of your cheesecakes, giving them a delightful tang.
- Sift in dry ingredients: In a separate bowl, sift together the all-purpose flour, baking powder, and salt. Gradually add this dry mixture to the wet ingredients, mixing on low speed until just combined. Be careful not to overmix, as this can lead to dense cheesecakes.
Cooking Process
- Fill the muffin tin: Using a ladle or a measuring cup, carefully pour the cheesecake batter into the prepared muffin tin, filling each cup about 3/4 full. This allows room for the cheesecakes to rise without overflowing.
- Bake the cheesecakes: Place the muffin tin in the preheated oven and bake for 20-25 minutes. The cheesecakes should be set around the edges but still slightly jiggly in the center. They will firm up as they cool.
- Cool down: Once baked, turn off the oven and crack the oven door open. Let the cheesecakes cool in the oven for about 10 minutes. This gradual cooling helps prevent cracks from forming on the surface.
- Chill in the fridge: After cooling in the oven, remove the cheesecakes from the muffin tin and transfer them to a wire rack. Allow them to cool to room temperature, then cover and refrigerate for at least 2 hours, or overnight for the best texture.
Assembling and Serving
- Prepare toppings (optional): While the cheesecakes are chilling, you can prepare any toppings you’d like. Fresh fruit, whipped cream, or a drizzle of chocolate sauce are all great options. If you want to keep it simple, a dusting of powdered sugar works beautifully.
- Remove from fridge: Once the cheesecakes have chilled, take them out of the refrigerator. If you used paper liners, gently peel them away from the cheesecakes.
- Plate the cheesecakes: Place each mini cheesecake on a serving plate. If you’re using toppings, now is the time to add them.
Conclusion:
If you’re looking for a delightful dessert that combines the lightness of a soufflé with the creaminess of a traditional cheesecake, then these Mini Japanese Cheesecakes are an absolute must-try! Their fluffy texture and subtly sweet flavor make them a perfect treat for any occasion, whether it’s a casual family gathering or a more formal dinner party. The best part? They are incredibly easy to make, requiring just a handful of ingredients that you likely already have in your pantry.
To elevate your Mini Japanese Cheesecakes, consider serving them with a variety of toppings. A drizzle of fresh fruit coulis, such as raspberry or strawberry, can add a vibrant splash of color and a tangy contrast to the sweetness of the cheesecake. Alternatively, a dollop of whipped cream or a sprinkle of powdered sugar can enhance their visual appeal and taste. For a more decadent twist, try adding a layer of chocolate ganache or a scoop of matcha ice cream on the side. The possibilities are endless, and you can easily customize these cheesecakes to suit your personal preferences or the tastes of your guests.
I encourage you to give this recipe a try and experience the joy of creating these delightful Mini Japanese Cheesecakes in your own kitchen. They are not only a feast for the eyes but also a treat for the palate. Once you take that first bite, you’ll understand why they have become a favorite among dessert lovers everywhere.
After you’ve made them, I would love to hear about your experience! Did you stick to the classic recipe, or did you experiment with your own variations? Share your thoughts and any creative twists you added in the comments below. Your feedback not only helps me improve but also inspires others to try their hand at making these delicious cheesecakes.
So, roll up your sleeves, gather your ingredients, and let’s get baking! I promise you won’t regret it. These Mini Japanese Cheesecakes are sure to impress your family and friends, and they might just become a staple in your dessert repertoire. Happy baking!
Mini Japanese Cheesecakes: A Delightful Recipe for Creamy Perfection
These mini cheesecakes are creamy and flavorful, making them a perfect treat for any occasion. Easy to prepare, they can be customized with your favorite toppings like fruits or sauces for added sweetness. Enjoy a delightful dessert that's sure to impress!
Ingredients
- 8 oz (225 g) cream cheese, softened
- 1/2 cup (100 g) granulated sugar
- 1/4 cup (60 ml) milk
- 1/4 cup (60 ml) heavy cream
- 2 large eggs
- 1 teaspoon vanilla extract
- 1 tablespoon lemon juice
- 1/4 cup (30 g) all-purpose flour
- 1/4 teaspoon baking powder
- Pinch of salt
- Butter, for greasing the muffin tin
Instructions
- Preheat the oven to 320°F (160°C).
- Grease a 12-cup muffin tin with butter or use paper liners, greasing them as well.
- In a large mixing bowl, beat the softened cream cheese on medium speed until smooth and creamy, about 2-3 minutes.
- Gradually add the granulated sugar while continuing to mix until fluffy, about another 2 minutes.
- Pour in the milk and heavy cream, mixing on low speed until just combined. Add the eggs one at a time, mixing well after each addition.
- Stir in the vanilla extract and lemon juice.
- In a separate bowl, sift together the all-purpose flour, baking powder, and salt. Gradually add this to the wet ingredients, mixing on low speed until just combined.
- Pour the cheesecake batter into the prepared muffin tin, filling each cup about 3/4 full.
- Bake in the preheated oven for 20-25 minutes until set around the edges but slightly jiggly in the center.
- Turn off the oven and crack the door open, letting the cheesecakes cool in the oven for about 10 minutes.
- Remove from the muffin tin and transfer to a wire rack. Allow to cool to room temperature, then cover and refrigerate for at least 2 hours, or overnight.
- While chilling, prepare any desired toppings such as fresh fruit, whipped cream, or chocolate sauce.
- Take the cheesecakes out of the refrigerator and gently peel away paper liners if used.
- Place each mini cheesecake on a serving plate and add toppings if desired.
Notes
- For best results, allow the cheesecakes to chill overnight for a firmer texture.
- Feel free to experiment with different toppings to suit your taste.

Leave a Comment